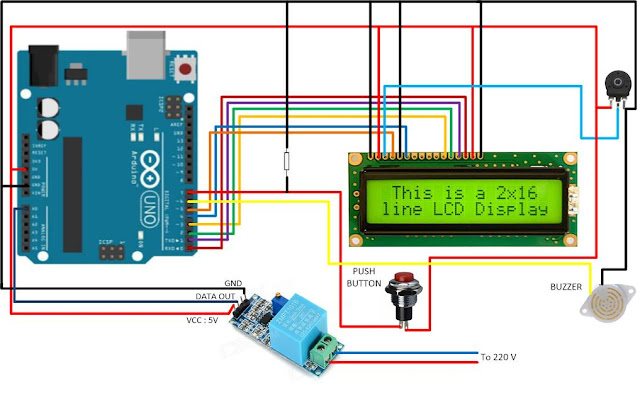
Pada Kesempatan ini saya akan mencoba membahas tentang cara membaca / monitoring tegangan AC 220 V dengan Arduino menggunakan sensor ZMPT101B, dimana display monitor kita menggunakan LCD 16 x 2, pada alat ini kita lengkapi dengan alarm pada saat ada tegangan AC Off, alarm overvoltage, alarm undervoltage dilengkapi dengan buzzer. baik untuk mempersingkat kita mulai siapkan komponen komponen yang diperlukan :
Upload code program berikut ke arduino :
#define SAMPLING 300
#define VOFFSET 512
#define ADC_PIN A0
#define AMPLITUDE 720.00
#define REAL_VAC 220.0
int adc_max,adc_min;
int adc_vpp;
const int Buzzer = 6;
const int buttonPin = 8;
int buttonState = 0;
#include "Wire.h"
#include <LiquidCrystal.h>
LiquidCrystal lcd(5, 4, 3, 2, 1, 0);
void setup()
{
lcd.begin(16, 2);
lcd.clear();
}
void loop()
{
BuzzerOff ();
overVoltage();
underVoltage();
plnOff();
lcd.clear();
lcd.setCursor(0,0);
lcd.print(" TEGANGAN ");
lcd.setCursor(0,1);
read_VAC();
float V = map(adc_vpp,0,AMPLITUDE,0,REAL_VAC*100.00)/100.00;
lcd.print("RN = ");
lcd.print(V);
lcd.print("VOLT");
delay(2000);
}
void read_VAC()
{
int cnt;
adc_max = 0;
adc_min = 1024;
for(cnt=0;cnt<SAMPLING;cnt++)
{
int adc = analogRead(ADC_PIN);
if(adc > adc_max)
{
adc_max = adc;
}
if(adc < adc_min)
{
adc_min = adc;
}
}
adc_vpp = adc_max-adc_min;
}
void BuzzerOff() {
// read the state of the pushbutton value:
buttonState = digitalRead(buttonPin);
// check if the pushbutton is pressed.
// if it is, the buttonState is HIGH:
if (buttonState == HIGH ) {
// turn LED on:
digitalWrite(Buzzer, LOW);
}
}
void overVoltage() {
read_VAC();
float V = map(adc_vpp,0,AMPLITUDE,0,REAL_VAC*100.00)/100.00;
if ( (V) >= 240 ){
lcd.clear();
lcd.setCursor(0, 0);
lcd.print(" WARNING");
lcd.setCursor(0, 1);
lcd.print(" OVER VOLTAGE");
digitalWrite(Buzzer, HIGH);
delay (5000);
}
}
void underVoltage() {
read_VAC();
float V = map(adc_vpp,0,AMPLITUDE,0,REAL_VAC*100.00)/100.00;
if ((V)<= 198 ){
lcd.clear();
lcd.setCursor(0, 0);
lcd.print(" WARNING");
lcd.setCursor(0, 1);
lcd.print(" UNDER VOLTAGE");
digitalWrite(Buzzer, HIGH);
delay (5000);
}
}
void plnOff() {
read_VAC();
float V = map(adc_vpp,0,AMPLITUDE,0,REAL_VAC*100.00)/100.00;
if ( (V) <= 50 ){
lcd.clear();
lcd.setCursor(0, 0);
lcd.print(" WARNING");
lcd.setCursor(0, 1);
lcd.print(" PLN OFF");
digitalWrite(Buzzer, HIGH);
delay (5000);
}
}
demikian sedikit penjelasan yang bisa saya jabarkan, semoga bisa bermanfaat,
jangan lupa comment bro... :)
berikut tampilan videonya :
- Board Arduino
- Modul LCD 16 x 2
- Modul Sensor ZMPT101B
- Buzzer DC 5 V
- Kabel Jumper
Upload code program berikut ke arduino :
#define SAMPLING 300
#define VOFFSET 512
#define ADC_PIN A0
#define AMPLITUDE 720.00
#define REAL_VAC 220.0
int adc_max,adc_min;
int adc_vpp;
const int Buzzer = 6;
const int buttonPin = 8;
int buttonState = 0;
#include "Wire.h"
#include <LiquidCrystal.h>
LiquidCrystal lcd(5, 4, 3, 2, 1, 0);
void setup()
{
lcd.begin(16, 2);
lcd.clear();
}
void loop()
{
BuzzerOff ();
overVoltage();
underVoltage();
plnOff();
lcd.clear();
lcd.setCursor(0,0);
lcd.print(" TEGANGAN ");
lcd.setCursor(0,1);
read_VAC();
float V = map(adc_vpp,0,AMPLITUDE,0,REAL_VAC*100.00)/100.00;
lcd.print("RN = ");
lcd.print(V);
lcd.print("VOLT");
delay(2000);
}
void read_VAC()
{
int cnt;
adc_max = 0;
adc_min = 1024;
for(cnt=0;cnt<SAMPLING;cnt++)
{
int adc = analogRead(ADC_PIN);
if(adc > adc_max)
{
adc_max = adc;
}
if(adc < adc_min)
{
adc_min = adc;
}
}
adc_vpp = adc_max-adc_min;
}
void BuzzerOff() {
// read the state of the pushbutton value:
buttonState = digitalRead(buttonPin);
// check if the pushbutton is pressed.
// if it is, the buttonState is HIGH:
if (buttonState == HIGH ) {
// turn LED on:
digitalWrite(Buzzer, LOW);
}
}
void overVoltage() {
read_VAC();
float V = map(adc_vpp,0,AMPLITUDE,0,REAL_VAC*100.00)/100.00;
if ( (V) >= 240 ){
lcd.clear();
lcd.setCursor(0, 0);
lcd.print(" WARNING");
lcd.setCursor(0, 1);
lcd.print(" OVER VOLTAGE");
digitalWrite(Buzzer, HIGH);
delay (5000);
}
}
void underVoltage() {
read_VAC();
float V = map(adc_vpp,0,AMPLITUDE,0,REAL_VAC*100.00)/100.00;
if ((V)<= 198 ){
lcd.clear();
lcd.setCursor(0, 0);
lcd.print(" WARNING");
lcd.setCursor(0, 1);
lcd.print(" UNDER VOLTAGE");
digitalWrite(Buzzer, HIGH);
delay (5000);
}
}
void plnOff() {
read_VAC();
float V = map(adc_vpp,0,AMPLITUDE,0,REAL_VAC*100.00)/100.00;
if ( (V) <= 50 ){
lcd.clear();
lcd.setCursor(0, 0);
lcd.print(" WARNING");
lcd.setCursor(0, 1);
lcd.print(" PLN OFF");
digitalWrite(Buzzer, HIGH);
delay (5000);
}
}
demikian sedikit penjelasan yang bisa saya jabarkan, semoga bisa bermanfaat,
jangan lupa comment bro... :)
berikut tampilan videonya :


saya mau tanya, rumus ini dari mana ya ?
BalasHapusV = map(adc_vpp,0,AMPLITUDE,0,REAL_VAC*100.00)/100.00;
bisa dijelaskan gak ? hehe
terimakasi
permisi mas saya mau nanya kalo hanya sekedar baca tegangan saja gimana kodingnya mas? terima kasih
BalasHapuslcd.setCursor(0,1);
Hapusread_VAC();
float V = map(adc_vpp,0,AMPLITUDE,0,REAL_VAC*100.00)/100.00;
lcd.print("RN = ");
lcd.print(V);
lcd.print("VOLT");
delay(2000);
Kok error ya mas
HapusSilakan Kunjungi link youtube berikut : https://www.youtube.com/channel/UC8o4mbFVPsZ5RjDntZjyYMQ
BalasHapussaya mau nanya mas "adc_vpp,0,AMPLITUDE,0,REAL_VAC*100.00" itu angka 100 dapet dari mana.?
BalasHapus